The Three Swings of Wright Balance: Which One Are You?

The Three Swings of Wright Balance: Which One Are You?

By Dr. David Wright
USGTF Contributing Writer, Oakland, California

Our 25 years of research has yielded the following: In summary, we are able to do simple body measurements, provide a student with stance widths that recruit different “core regions, “and match stance widths, posture and grip to their playing core region for maximum power and consistency. There are three ways to swing a golf club. These swings come out of one of our three core regions.

The following is an illustration of nine core regions that are identified by a printout from the results of the measurements of stance widths that recruit precise core regions. Each core region has different stance widths, posture, grip and swing characteristics.

The nine core regions within three main core regions

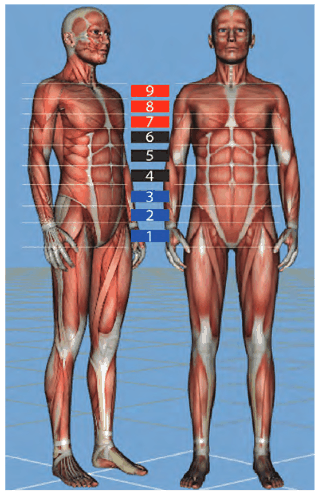
These nine core regions relate to one of three golf swings as follows:

Lower Core Swing

The “lower core,” regions 1, 2 and 3, entails the area from the navel to the pelvic floor. Players in this region have the widest stance width of all players. They “test” for greater strength in their lower body and they have the ability to place their trail arm inside their hip in the downswing. Lower core players are body swingers. They have the strongest grip, the greatest shaft lean, and the greatest trail shoulder tilt at address. When we measure the posture angles of the lower core player, their spine angle and thigh angles are equal. Their spine and thigh angles are 151 degrees or less when measured 90 degrees to the ground. Their ball position is center to center- back to accommodate the greater shaft lean. The butt of the club of the lower core player will point toward the target-side thigh.

The lower core player has a short thumb due to gripping the club so that the bottom of the grip crosses the second pad up on the middle finger of both the left and right hands. This grip “in the fingers” is what produces the greater shaft lean and stronger grip. Shaft lean is a natural position produced by the grip.

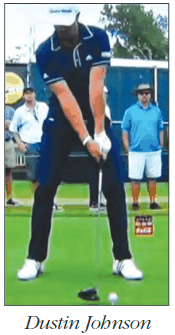
The lower core player starts the sequencing of the backswing with their upper core as the shoulders, arms and hands turn as one unit. Their trail hip turn is deep and the target-side knee points to the front of the ball. The wider stance width facilitates a restriction of the hips in the backswing. The lower core player has the greatest separation of the upper and lower body in their backswing. The plane of their shoulders approximates level at the top of their backswing and/or they sit down and level their shoulders before starting the club down, similar to Dustin Johnson and Jordan Spieth. Their center of mass is over their trail hip at the top of their backswing and their trail hand is “under,” with the forearm of that trail arm perpendicular to the ground.

In the downswing, the lower core player begins with a rotation of their hips and their shoulders, then the arms and hands follow, just the opposite of the backswing sequence. The trail elbow is seated inside the trail hip in the downswing, similar to Ben Hogan, and the shaft plane crosses the trail arm and drops further as the butt of the club points at the lower core at impact. The hips are 75 to 90 percent cleared at impact and the delivery to the ball is under, with an extension of the clubhead down the line.

The lower core player’s balance is over the center of their arches at address and through the swing. This is an important point we will revisit. Again, note that the lower core player’s balance is over the center of their arches. The lower core player gets their power from the ground using linear (horizontal) and torque (rotational) ground force with minimal to no vertical forces through
their swing.

Ben Hogan is the poster person of the lower core player. His swing was the model for many teachers for decades, myself included. And why not? A player of Hogan’s caliber should be emulated, but maybe not. Read on and you begin to see how unique each of us is.

Current lower core tour players include Johnson, Spieth and Paula Creamer. In spite of the proliferation of Hogan’s model, lower core players are rare in men. I am a lower core player. My legs were always the strongest part of my body and still test the strongest to this day. Lower core players are more often found in women players due to the fact that the greatest lean muscle mass in women is in the middle and lower core. Men, as a rule, have greater lean muscle mass in their upper core. Our research shows that the lower core male is a rare breed. Out of 90 elite male players and 10 elite female players in a study of ground reaction force one of my colleagues is doing, he found six percent tested strongest in their lower core. If he had an equal number of women in this study, we would find that the majority of the women would be lower and middle core players.

Upper Core Swing

The upper core, regions 7, 8 and 9, includes the base of the sternum to the neck. Players in this region have the narrowest stance widths, the least amount of shaft lean and a forward ball position. Their stance width is well inside their shoulders. The upper core player’s shaft lean is just inside the interior groin of the target-side leg, closer to their midline than their target side thigh.

The upper core player has a long left-hand thumb due to gripping the club so that the grip crosses the first pad up next to the palm on the middle finger of both the left and right hands. This grip position is what produces the minimal shaft lean and weaker grip. Shaft lean is a natural position produced by the grip.

The upper core players “test” for greater strength in their upper body and their trail arm will only “seat” at the side of the rib cage when tested, much less than the lower core player. The upper core player is unable to seat their trail arm inside their hip in the downswing. Their trail elbow is outside the trail hip on their side. Upper core players are arms and hands swingers. Their weak grip and grip position produce the least shaft lean and the least trail shoulder tilt at address of all the players.

When we measure the posture angles of the upper core player, their spine angle is much greater than their thigh angle. The thigh angle measures 158 degrees or greater at address.

The upper core player starts the sequencing of their backswing with both their upper and lower body. Their trail hip turn is deep and the target- side knee points well inside the back of the ball. The upper core player has the greatest hip turn and the least separation of the upper and lower body at the top of their swing, and the plane of their shoulders is vertical. Their center of mass is over their target side at the top of their backswing and their trail hand is on top of the grip, with the forearm of that trail arm “flying,” two things I attempted to “fix” in too many players. When I would see that upper core players with their center of mass on the target side, I believed that was a “reverse pivot” and the “flying” trail elbow, I believed, needed to be inside that target-side hip, just like Mr. Hogan. Why not? That worked for Mr. Hogan and for me. Why not everybody else? Fortunately, the great upper core players did what was “natural” for them. They use terms like covering the ball and release of the arms and hands.

In the downswing, the upper core player is already target side. They begin with a rotation of their shoulders and hips. Many upper core players will describe a feeling of an “over the top” swing as they begin to work on their new motion. The trail elbow is “outside” the trail hip in the downswing. As the hips reach parallel to the target line, there is a change of direction upward, and the upper core player often comes out of posture, rising through impact. The hips have minimal clearance at impact due to the direction change upward and also due to their balance being on the balls of their feet. The arms and hands lead and exit quickly left in the release of the club. The club points at the upper core at impact. Rising through impact is a must for the upper core player. If you tell  an upper core player to stay in their posture through impact, you will see an immediate power leak.

The upper core player’s balance is over the balls of their feet at address and through the swing. This is an important point we will revisit. Again, note that the upper core player’s balance is over the balls of their feet. The upper core player gets their power from the ground using torque (rotational) and vertical ground force. The upper core player has very little, if any, linear/horizontal motion in their golf swing as they load to their target side with a big trail hip turn, elbow out and on top position at the top of their backswing.

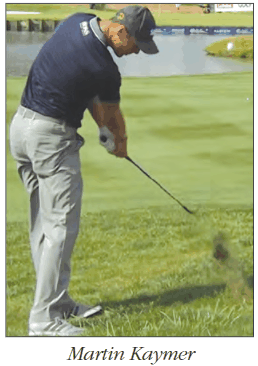
Current upper core tour players include Patrick Reed, Martin Kaymer, Phil Mickleson and a significant percentage of those playing the PGA Tour now. The only upper core women’s tour player I have seen is Laura Davies. Upper core players are rare in women.

Middle Core Swing

That leaves us with the middle core player. The middle core player is the hybrid. They have characteristics of the upper and lower core player. They have the “gold standard” swing. The middle core, regions 4, 5 and 6, entails the area from the navel to the base of the sternum. Players in this region have a stance width in between the upper and lower core players. They “test” for greater strength in their middle body around their torso and they do not have the ability to place their trail arm inside their hip in the downswing. Middle core players are both body swingers and arms and hands swingers.

The middle core player has a “neutral” grip, with the bottom of the grip crossing the first knuckle joint of the middle fingers of the left and right hands. This grip position produces a neutral grip, and their shaft lean is between the upper and lower core player, as is their stance width.

When we measure the posture angles of the middle core player, their spine angle is slightly greater than their thigh angle. Their thigh angle measures between 152 and 158 degrees, generally in the 154 to 156 range. Their trail arm seats just at the trail hip in the downswing.

The middle core player starts the sequencing of the backswing for the first 12 inches or so with their upper core as the shoulders, arms and hands turn as one unit, then the hips release. Their hip turn is greater than the lower core but less than the upper core. Their target side leg points just inside the back of the ball. The middle core player has separation of the upper and lower body between the lower and upper core in their backswing. The plane of their shoulders is “neutral” at the top of the backswing. Their center of mass is centered over the pelvis at the top of their swing. Their trail hand is on the side of the grip at the top of the swing, and their trail forearm is perpendicular to slightly “out,” relative to the ground.

In the downswing, the middle core players begin with a rotation of their hips, and their shoulders, arms and hands follow, just the opposite sequence of the backswing. The downswing shaft plane crosses the middle core and the butt of the club points at the middle core at impact. The trail elbow is seated at the trail hip in the downswing. The hips are 45 to 60 percent cleared at impact and the delivery to the ball is on the side with a release 45 degrees (diagonally) to the target line.

The middle core player’s balance is just forward of the center of the arches and behind the balls of the feet at address and through the swing. This is an important point we will revisit. The middle core player gets their power from the ground using linear (horizontal), torque (rotational) and vertical ground force, all three power sources.

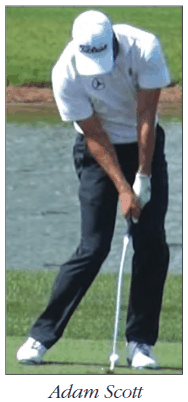
Current middle core Tour players include Adam Scott, Jon Rahm, Jason Day, Ernie Els and Justin Thomas. LPGA Tour players are middle and lower core. Each of these middle core players share a bit of upper and lower core characteristics.

Balance Points of the Different Core Regions

Now let’s revisit the points of balance in each of these core regions. Everything I have described here is related to balance. The lower core player is over the center of their arches and their ball position is center-back in their stance. Without a club, and with a ball on the floor or ground center-back in a wide stance, set up in a posture so your weight is over the center of your arches. Turn your trail hand so your palm is angled up toward the ceiling at a 45 degree angle. Now, turn back to the top of the swing with your weight still over the center of your arches and your trail hand in that “strong” position. Notice that your center of mass is over your trail hip side. Now start your downswing with your hips and notice how easily your hips turn through to finish in that center of arches position.

Now let’s go to the balance and setup positions of the upper core player. Set your weight over the balls of your feet, move the ball forward and narrow your stance. Now turn your trail hand to a “weaker” position so that it is angled toward the floor at a 45 degree angle. Now, turn in your backswing with your weight over the balls of your feet and your trail hand angled down with a forward ball position. Don’t fight staying on the target side. That is where your center of mass is going, so let it go. If you “move off” the ball as your first move, you won’t feel that target-side center of mass. Just rotate around that forward ball position. Remember, the upper core player uses rotational and vertical ground force. You have the rotational force in your backswing and downswing. Let’s find the vertical force. Stay on the balls of your feet and start your downswing. Notice how your hips “stall” at impact and you change direction moving upward. There’s your vertical ground force. Notice how quickly your arms and hands exit left as they pull your hips through. Also notice the feeling of “covering” the ball.

Lastly, let’s go to the middle core motion. Set your stance width just inside your armpits. Move your ball center to center-forward in your stance. With a flat palm, point the fingers of your trail hand straight ahead so that your trail hand is perpendicular to your body. Set your trail arm elbow just forward of the middle of your body and on your trail hip with your fingers still pointed straight ahead. This is a “neutral” trail-hand grip position. Set your weight just forward of the center of your arches and just behind the balls of your feet.

Now with your fingers pointed straight ahead, slowly begin your backswing with your shoulders, arms and hands. When your trail hand reaches 30 to 40 degrees to your target line, release your hips and continue turning. You should feel very centered in your backswing over your pelvis. Now turn through to the finish starting with your hips, keeping your balance just forward of the center of your arches and behind the balls of your feet. You will notice a release of your hips that is greater than the upper core swing and less than a lower core swing. You may notice minimal lateral motion back to the ball and a tendency to come up and out of posture. Notice that you are somewhere between the feeling of an upper and lower core impact position. The middle core player uses the ground in all three forces, linear or horizontal, torque or rotational, and vertical or launch.

If you are interested in exploring more about Wright Balance as it applies to your playing or teaching, take a look at the e-book on the homepage at www.WrightBalance.com. You will find the history and the brain trust behind the research and several hundred pages of illustrations of tour players from upper, middle and lower core regions.

USGTF honorary member David F. Wright, Ph.D., holds two doctorates. His areas of specialization are in research, the psychology of learning and psychophysiology. He was a member of the full-time faculty of the University of Southern California School of Medicine for four years and he has been a member of the clinical faculty of the School of Medicine for over 25 years. Dr. Wright has been a golf teaching professional since 1982. He is the author of four books on golf and numerous golf magazine and professional journal articles, videos and audio CDs. Dr. Wright conducted a three-year golf research project in Dr. Frank Jobe’s biomechanics lab at Centinela Hospital in Los Angeles from 2004 through 2007. He has been described by Sports Illustrated and Golf Magazine as the “balance expert” and in Golf Digest of Japan as the “foremost expert on balance” and “…leader in balance instruction across all sports and industries.”
Little Things Lead to Big Scores

Little Things Lead to Big Scores

If you ask golfers what you need to do to shoot low scores, they probably would say things like hit the ball far and straight and make putts, and they would be correct. Shooting low scores requires a certain skill set that is honed through years of dedicated practice.

To achieve these skills, golfers everywhere spend countless hours on the range and practice putting green, working tirelessly to improve. They may also receive professional instruction, which focuses largely on mechanical technique. A certain few may further seek out help for the mental game in the form of books or visiting a sports psychologist. All of these skills are necessary in order to play the game and to shoot the lowest scores possible.

But often overlooked are the little things that can wreck a score. Newly crowned United States Senior Golf Teachers Cup champion Grant Gulych has three things he considers important. “I always figure if I don’t have penalty shots, don’t three-putt and don’t make double bogeys or worse, I have a great chance to win,” said Gulych. Those who average around 90 – bogey golfers – can certainly alter their play to avoid penalty shots and three-putts. However, avoiding double bogeys for 90-shooters can be problematic, so they can amend this advice to avoiding triple bogeys.

Noted teacher Hank Haney says that to prevent big numbers on the scorecard, three things must happen: no penalty strokes, no three-putts and no “two-chips” (taking more than one shot to reach the green on short pitches and chips). The first two mirror Gulych’s list, while the third is something that the late USGTF examiner John Nichols always said. Nichols put it another way, describing it as “making sure your miss is on the green.” It underscores how important it is to make sure you have a putt instead of another chip. This may involve becoming more conservative when the golfer is short-sided (where there is not much green to work with when the ball is off the green), and accepting a longer putt instead of trying to get the ball close.

Mark Harman, USGTF national course director and newly crowned CGTF and United States Golf Teachers Cup champion, has what he calls his “cardinal sins” to avoid: three-putting, missing a putt from under four feet, making bogey with a wedge approach and making either a six or a double bogey or worse on the card. In winning the CGTF and U.S. titles recently in Niagara Falls, Ontario, Harman did not have one cardinal sin on his scorecard.

What do all of the items on Gulych’s, Haney’s and Harman’s lists have in common? All of them are seemingly easy enough to avoid, but all of them are also advice given to and by excellent golfers! So if low handicappers and pros struggle with these simple items, imagine what the club golfer faces. Harman, for example, says that he routinely averages two to three strokes lost every round by not avoiding his “cardinal sins.” Gulych, while an accomplished champion, doesn’t emerge victorious all the time, which means he commits the errors on his list when he doesn’t win.

Each item on these lists highlights how important it is to avoid the little things that can lead to big scores. For example, the tee shot on a particular hole may be fraught with danger everywhere. The driver may not be the best play, so the player should use the longest club that he trusts will hit the ball into the fairway. When it comes to penalty strokes, the golfer needs to take extra care to shoot away from the penalty area or hazard, and not take unnecessary risks. It can be tempting to take Phil Mickelson- type risks, but the golfer needs to ask himself what the penalty for failure is. Most of the time, the risk is not worth the reward.

On the greens, most three-putts are because the player’s distance control was lacking. Go to any golf course and you will see players mainly practicing from the 10-15 foot (3-5 meter) range. Very rarely will you see golfers spending adequate time practicing from outside 30, 40, or even 50 feet, but these are the very distances that three-putts become common. Most golfers are likely to have at least one or two first putts from long range, and these become almost sure three-putts because they never practice from there.

Yes, it’s the little things that destroy scores faster than a lack of ability to hit long drives or laser-like irons. Avoiding these little things are in the realm of most golfers, including average golfers. They just require an attention to detail, more conservative play, and common sense. A good coach will instill this mindset into their players, and the players in turn will see the rewards on the scorecard.
The Station

The Station

Tucked away in our subconscious is an idyllic vision. We see ourselves on a long trip that spans the continent. We are traveling by train. Out the windows we drink in the passing scene of cars on nearby highways, of smoke pouring from a power plant, of row upon row of corn and wheat, of flatlands and valleys, of mountains and rolling hillsides, of city skylines and village hills.

But uppermost in our minds is the final destination. On a certain day at a certain hour we will pull into the station. Bands will be playing and flags waving. Once we get there so many wonderful dreams will come true and the pieces of our lives will fit together like a completed jigsaw puzzle. How relentlessly we pace the aisles, damming the minutes for loitering waiting, waiting, waiting for the station.

“When we reach the station, that will be it!” we cry. “When I’m 18.” “When I buy a new 450SL Mercedes Benz!” “When I put the last kid through college.” “When I have paid off the mortgage!” ‘When I get a promotion.” “When I reach the age of retirement, I shall live happily ever after!”

Sooner or later we must realize there is no station, no one place to arrive at once and for all. The true joy of life is the trip. The station is only a dream. It constantly outdistances us.

“Relish the moment” is a good motto because it isn’t the burdens of today that drive men mad. It is the regrets over yesterday and the fears of tomorrow. Regret and fear are twin thieves who rob us of today.

So stop pacing the aisles and counting the miles. Instead, climb more mountains, play more golf, eat more ice cream, go barefoot more often, swim more rivers, watch more sunsets, laugh more, cry less. Life must be lived as we go along. The station will come soon enough.
Paddles and Oars

Paddles and Oars

By Norm Crerar, USGTF Contributing Writer Vernon, British Columbia

I have just finished reading one of the most motivational and touching books I have read in some time. The title of the book is The Boys in the Boat, by Daniel James Brown. It is the story of nine Americans and their epic quest for gold at the 1936 Berlin Olympics. Set in the Seattle and Olympic Peninsula area, the lives and tough times of the members of a Men’s 8 rowing team during the Depression are brought to light. The hardships people at that time and in that place had to endure are hard to imagine in this day and age.

A nine-member team is made up of eight rowers and a cox. The boat is 62 feet in length; the sweep oars are in the nine-foot range. The team members have to be strong enough to pull their weight and their part of the boat with stroke rates of 25-40 per minute. This may sound easy, but to be top of the heap in a rowing race that lasts six to sixteen minutes – depending on the length of the course – depends on one thing: All of the team members have to be pulling together at exactly the same time in the same direction and working just a bit harder than everyone else.

In 1967, Canada celebrated its 100 years of Confederation. There were events and civic celebrations across the country all year. The largest and most ambitious event was the Canadian Voyageur Canoe Pageant. This was a race from the Rocky Mountains to Montreal, 6,000 km (3,700 miles) over 104 days, and retraced the old fur trader routes. The Voyageur canoes were 25 feet long, 4 feet wide, weighed 400 pounds and seated six paddlers. It was a stage race where the ten canoes, one from each province or territory in Canada, lined up every morning and raced to the next town or city. Some of these daily laps were three or four hours long, but some were also 12 and 14 hours. As well, because the canoe teams were spread out due to ability and strength. Special sprints were put on in cities and towns so the locals could see the ten teams all together in full attack mode. The sprint courses were either A to B or circular over a course that was as short as 2 km or as long as 6 km. The times for the laps and the sprints were added on each day. There were money prizes for the teams at the end of the race, but the sprints provided extra money. (Some total purses for the sprints were in the neighborhood of $500, with the winning team receiving $100. This did not go far, as there were nine paddlers per team plus a chief voyageur/manager).

As the race went on, every one of the 100 paddlers was in excellent physical shape, and the only thing that separated the teams was the teamwork and that special ability to work as a team. In The Boys in the Boat, the boys talked about the feeling of the boat “flying.” I was captain of the winning Manitoba canoe in that 1967 event, and our team members often talked about our canoe “flying.” There were times when every paddle stroke and every heartbeat and every breath seemed to be in sync, and the boat did “fly.” What we experienced, and as also mentioned in The Boys in the Boat, were the other times when we paddled and everyone was pulling as hard as they could, but the boat felt like we were pulling a pail on a rope behind us. If even one person was just a fraction off, the “flying” became “towing.”

What does this have to do with golf teaching and the USGTF? Not that much about golfing, as that is very much an individual activity. In my consulting work with companies and organizations, I have put management people in Voyageur canoes and tried to get them to feel what it is like to be a team. I have used the metaphor of the paddlers and rowers to illustrate what can happen. Your USGTF is a remarkable story that has been some 29 years in the making, from a vision to a few courses to now a worldwide organization. This only happens and can only sustain itself if everyone is on the same page, shares the vision and continually works to make things bigger and better.

If you are in the Big USGTF canoe, pick up your paddles, and for the sake of the organization, paddle in the same direction at the same time!

USGTF Embracing Golf’s History

USGTF Embracing Golf’s History

By Mike Stevens USGTF Member, Tampa, Florida

Teachers in any given field are the protectors and disseminators of history. History is something that has happened and is factual. Is it important? Some would say, “Who cares what happened in the past?” That is especially true in these modern times. History, however, is important to a society. It provides a sense of respect and pride in a given discipline. In sports, baseball comes to mind as a game that truly honors its past. On just about any broadcast, an announcer can immediately cite a statistic from the origins of the game. Stories about the legends of the sport are passed down from father to son to grandson…daughters and granddaughters, too. Why? Because as humans, we are heading somewhere, and the past helps us in that endeavor.

Golf is almost as old as baseball in this country. It has a grand history despite constant changes to equipment and courses over the years. Golf’s past is a fascinating story worth telling all new and regular participants of the game.

The United States Golf Teachers Federation has been a staunch ally when it comes to embracing and encouraging its members to teach and experience golf’s roots. The USGTF regularly sponsors events that recreate the game as it was first played in America with the use of hickory-shafted golf clubs. The organization encourages its members to participate in these events, because understanding golf’s origins makes for better teachers. The United States Professional Hickory Golf Championship and the World Hickory Open are two of the most significant events on the hickory calendar each year that are sponsored and supported by the USGTF.

There is no better way to share the experience of our fore-fathers than to play with the instruments of those years. Fortunately, there are still plenty of them in circulation and plenty of tournaments around the globe in which to compete.

Teaching golf is very rewarding, especially when you can share some of the history of the game with your students. It will give them a better appreciation and respect for this honest and decent endeavor.

Just hit a hickory club and wonder about its story. The experience will enrich your life.
Confidence is a Choice

Confidence is a Choice

By Dr. Gregg Steinberg USGTF Sports Psychologist, Nashville, Tennessee

This past April, Patrick Reed won the Masters. What impressed me most was his second shot on #15 on Saturday. It was rainy and a bit risky to go for it, but he nailed his shot and his ball just cleared the water. From there, he made a birdie which helped him win the tournament.

Patrick Reed has complete confidence in his abilities. Remember, early in his career he said he was a top-five player in the world, although he was not even close to that ranking at the time. The media admonished him for that, but that showed me that this guy is a winner and will be a winner!

Patrick Reed gets it. Confidence is a choice. This is one of the most powerful mental-game ingredients that I can share with you. No matter how many bad shots you just hit or how many easy putts you just missed, you can still choose to be confident. Regardless of outcome, you can always be confident, but that mental skill is supremely difficult.

Another story that relates to this mental skill that I love to tell at all my seminars relates to the great Tom Watson. Most golf fans will remember his remarkable chip-in on the 17th hole at the 1982 U.S. Open at Pebble Beach, where he went on to victory. However, on the seventh hole, he missed a putt from two feet. Watson didn’t lose confidence in his putting; he merely told himself that even great putters miss an occasional easy one.

Winners, like Reed and Watson, choose to be confident regardless of the situation or past disaster. This is what makes them champions. Here are a few suggestions for you to help your students build their confidence:

  1. Create a confidence journal. In this journal, write a confidence statement everyday such as, “I choose to be confident” or “I am a great putter” or “I am good out of the bunker.” This journal will help to make a habit of making confidence statements when you are in a pressure situation.

  1. Record the time when you were very confident.  Record the shot you hit as well as why you were confident and what it really feels like to you, because everyone is unique in this regard. When you feel your confidence sliding, just glance at this journal to get a quick jolt of confidence.

Make confidence a choice and a habit, and you will increase the chances of playing your best in every situation!

About the author: Dr. Gregg Steinberg was ranked by Golf Digest as one of the world’s greatest sport psychologists and is the USGTF sport psychologist. If you want to learn how to teach your students key mental-game aspects, the International Golf Psychology Association (IGPA), endorsed by the USGTF, has created an on-line course at www.MasteringGolfPsychology. com. This course was created by Dr. Steinberg, and members of the USGTF can access the course for half price using the promo code iggy199. In addition, Dr. Steinberg just completed the Masters Level Golf Psychology Webinar Series in April and plans on conducting another Masters Level Golf Psychology Webinar series in October, 2018. If you have interest or any questions, please contact him at mentalrules24@msn.com.  
The Dreaded Yips

The Dreaded Yips

By Bert Jones, USGTF Member, Loomis, California

Don’t even say the word, as you might get infected. If you do say the word, say it in a hushedtoned in a quiet place. The yips are deadly and candestroy even the best game of golf.

Don’t feel bad. Even professional golfers have theyips. Professional golfers seriously afflicted by the yipshave included Padraig Harrington, Bernhard Langer(thus the long putter), Ben Hogan (maybe it was thecar accident), Harry Vardon, Sam Snead (rememberthe croquet-styled stance outlawed by the USGA?),Ian Baker-Finch and Keegan Bradley, who missed asix-inch putt in the final round of the 2013 HP ByronNelson Championship due to the condition (althoughhe may also have been suffering from strabismus, amisalignment of the eyes).

The Mayo Clinic found that 33 to 48 percentof all serious golfers have experienced the yips. Itwas Tommy Armour who coined the term; thanks,Tommy. Over the years, others referred to it as thejerks, the waggles, the shakes, and even whiskey fin-gers. I like the latter term the best – don’t you? It’spainful to watch, and I have to turn my head.

It is believed that the yips are caused by focaldystonia, whereby the brain sends electrical signals tothe muscles in an incorrect sequence. There are twokinds of yips, rotational and acceleration. Most of uscould figure out the latter!

As teaching professionals, we must think aboutproper diagnosis of the problem and determinewhich type of yip the student has. Video and a prod-uct called Blast Motion are great ways to help youdetermine what the heck is going on. When using video, you need to place your iPhone at ground level(go to www.EyeLine.com and take a look at slow-motion as a useful tool). Your iPhone has a slow-motion button and can be operated by a Bluetoothremote. I use my iWatch remote function to controlmy iPhone. Video using a bi-colored ball can easilypick up on acceleration yips. Blast Motion is anotherdevice that you place in the butt end of the putter.Using an app on your iPad, it produces some excel-lent metrics to diagnose rotational yips. Students lovethe quick and accurate feedback.

Now, let’s talk about a cure. For those that wantto flip their right hand at impact (assuming aright-handed golfer), I suggest a grip change suchas a pencil, claw, or left-hand-low grip. Placing aSharpie on the wrist and taping it, or using a rubberband, is a cheap way to help the student feel the flip.Acceleration yips are a programmed response, and weneed to create new neural pathways to create change. Try providing a series of balls of different kinds –ping-pong, tennis ball, balls of steel, etc. Have thestudent putt these balls in a series, followed by a realgolf ball (repeat the drill over and over again). The drill is designed to break the cycle of anticipation.Eyeline Golf also has a product called the Putting Pen-dulum to help provide proper sensation and rhythm.

Students and teachers need to understand thatthe rotational yips are an over-rotation of the putterthat leaves the putting plane. It is hard to believe, butevery stroke has arc – even the straight-back-straightputting stroke. A simple fix is the use of the PuttingRail from eyeline.com as a means to help the studentfeel and stay on plane.

Lastly, I offer two other ideas for your consid-eration. The first is placing a large ball between thewrists or forearms to help the student stay connected.The last drill is the two-ball drill, whereby the studenttries to putt two balls at the same time which areplaced side-by-side. Both drills help the student withover- or under-rotation.

No more three-putts, and don’t forget to analyzetheir equipment!
The Snow Board

The Snow Board

By Larry Van House, USGTF Member, Camp Hill, Pennsylvania

“Hit the small ball before the big ball.” This is the most important skill to achieve to develop a golf swing…period. When a client can learn to do this successfully 90 percent of the time, his or her golf experience will improve drastically.

The small ball is, of course, a golf ball. The big ball is the earth. Hit the earth first, followed by the ball, and you will have hit a “fat” shot. Much of the energy of the swing and the speed of the clubhead will just sink into the earth. The ball may advance down the fairway, but it will not achieve the distance or backspin it could have. The fat shot will not stop and hold on a green. I am sure that a very large percentage of our clients will hit the earth first. We can teach them all sorts of things about a golf swing, but they will never realize anything close to their potential if they continually strike fat shots.

A deep divot after the ball is not always necessary or desirable. A shallow divot after the strike is fine, but it must start at the golf ball or even slightly in front of the ball.

Strike the golf ball first and then the turf, and all of the good things in golf are possible.

The truth of this is shown in Bobby Clampett’s “Impact Zone” golf teaching. Mr. Clampett shows how a golfer can test himself/herself quite easily by drawing lines in sand or even on grass turf, placing a golf ball on the line, swing, and obtain instant feedback on the quality of the swing – not just fat or thin but directionally, as well. Striking a golf ball isn’t even necessary. Swinging at the line in the sand can be sufficient. This is a perfect diagnostic test of a golf swing. But…how can the golfer make his/her body do the things necessary to hit the small ball before the big ball? Mr. Clampett has answers for that, as well. Helping our clients make this adjustment should be, I believe, also our first and most important task.

This method of drawing lines in the sand or turf works very well when it is possible to practice a golf swing outdoors. But what can we do to bring this diagnostic test indoors when the weather is bad? I worked on this problem for quite a while. I hoped to be able to bring this teaching method indoors to my indoor golf studio in Pennsylvania. I tried several potential high-tech solutions. They worked, but they were expensive and didn’t give the instant feedback that a simple line drawn in sand can give.

I finally settled on a low-tech solution. It is quite inexpensive and works perfectly. I call it my “Snow Board.” I think it may help you in your lessons for clients indoors, or even if it is used outdoors.

My Snow Board is a sheet of plastic (polycarbonate – G.E. trademarks it as Lexan) painted on both sides with black spray paint. The “snow” on my Snow Board is a covering spray of imitation snow – the stuff people use for seasonal decorations at Christmas. This imitation snow stands out bright white on the black background. I tried a lot of other white materials, and the imitation snow has been the best. Foot powder works well, but it takes a few minutes to turn white on the black background. This makes an unwanted delay in the progress of a lesson.

After spraying the imitation snow on the sheet, I draw a few lines on it with an aiming stick. I place a ball on the lines and ask my client to swing away. This is the first thing I do with a new client after they warm up. The results of this little test are, on almost all occasions, a major revelation to my clients, some of whom have been playing golf for many years. They are usually, as the Irish say, gobsmacked.

I think that when golfers go to a driving range, they are too interested in only watching the flight of the ball. They do not tend to examine the turf and the divot their club makes and its relation to the location of the ball. I think that may be why they are so surprised when they see the results their swing made as their club struck the Snow Board several inches behind the ball.

I ask them to make several swings and measure their results in inches behind where the ball was placed. I record this information as a way to measure later success. The Snow Board also provides a record of the direction of the swing. Whether a swing is outside to in, inside to out, or directly at the target, is plainly visible. Then, after discussing the importance of this test and of the great opportunities that will come when the strike on the Snow Board is made in front of the ball in a straight line toward the target, we get to work.

After the session, the Snow Board and the golf clubs can be cleaned easily with just water and a light brushing. The imitation snow that has splattered vacuums up from my golf mats quickly.

The Snow Board is my most important swing diagnostic. In a series of lessons with clients, I use it often as my clients’ swings progress. I would recommend that you consider using a Snow Board or similar device in your lessons, even if the lessons are conducted outdoors. Sand traps are not always readily available for us to use.

The results that appear on a Snow Board seem to be immediately understood by clients. The results are measurable and provide a visual direction for future lessons.
Teaching Green Reading

Teaching Green Reading

By Bert Jones USGTF Member, Loomis, California

There are four major elements to putting: equipment, the putting stroke, the setup and green reading. Since putting is approximately 42 percent of the game, it deserves more attention.

Over the years, I have distilled green reading into three styles: instinctual, AimPoint (invented in the 1990s), and Vector Green Reading (invented in the 1970s). Instinctual green reading lends itself to motor programming over time where the brain learns how the ball will behave under certain conditions. But is it that easy? Let’s take a closer look at how course architects fool your instinctual learning through optical illusions, pin placements and green types.

Course architects use four different types of greens: planar, tiered, saddle and crowned. Planar, the most common and which comprise 95 percent of all greens played, are characterized by a high and low point. In other words, planar greens are in fact a tilted plane. Tiered greens are devious, with players three putting 38-45 percent of the time, and are rarely built due to cost. Saddle greens are even rarer but do exist, and can be combined with planar greens. Take one look at Augusta! The last is crowned, as exampled by #2 at Pinehurst. They are upside-down bowls used to efficiently move water from the surface. Architects know that the hydrodynamics of water need a 2 percent incline.

So, course designers have four different types of greens to throw at you. In addition, they can design greens to maximize difficult pin placements, like #17 at TPC Sawgrass, home of the Players…splash.

But let’s get back to green reading, which can be taught. Vector Green Reading, which is the precursor to AimPoint, is a science-based approach to reading greens. Col. H.A. Templeton, who invented Vector Green Reading back in 1979, was an Air Force SR-71 spy-plane pilot. This was no small feat, since there were only 31 of these titanium planes ever made. In addition to being an expert pilot, he was a frustrated single-digit golfer. He was so frustrated with his putting that he decided to compute the math needed to read how much a ball would break using green speed, slope percentage and distance away from the hole. To make the math work, the ball needs to have enough speed to travel 12 inches by the hole. It pays to be a left-brain (analytical) thinker to use Vector Green Reading!

Let’s try an example. The ball is 10 feet away from the hole on a green with a Stimpmeter reading of 10, and the slope at the hole is 2 percent. To determine the break, we need to find the zero-break line. The ZBL is the straight putt up or down the fall line. There is only one ZBL on a planar green. You can find it by walking around the hole to determine where the ball will not break when putted. Finding the slope (which admittedly is hard) can be found by standing near the hole and facing up the ZBL. Standing perpendicular to the ground, feel the pressure in your feet. If you feel pressure in your toes, use 1 percent; balls of your feet, 2 percent; arches, use 3 percent, and heels, use 4 percent. Most holes are cut between 1 and 2 percent to move the water off the greens. Now that you have found the ZBL and slope, you will need to take the number from Col. Templeton’s chart using the Stimpmeter data inputs.

In this case, the ball will break 10 inches. Measure 10 inches from the center of the hole up the fall line to find the aiming point. A straight line is found by using the aiming point and your ball position. Putting the ball at the aiming point with the correct speed will cause the ball to reach a vector known as the inflection point. The inflection point is where gravity takes over the ball to create break.

The need for correct speed is a critical component, as aim is intuitive and speed is not. Incorrect speed will cause the ball to travel on the wrong path and be short or long, depending on the stroke. I often joke with students that 100 percent of short putts don’t go in, so get in the habit of going past the hole. Besides, you might get lucky. Some teachers teach die-in-the-hole putting, which I find impossible for several reasons: No one can judge the exact speed all of the time; ball imperfections create an error rate; the donut effect of players walking around or standing by the hole creates a slight incline at the hole, and green imperfections can move your ball off line.

Col. Templeton stated that you need the foot-by-the-hole speed to make his math work, which makes sense and meets my criteria for avoiding the items listed above. The only problem with speed is that the hole capture rate is reduced by 12 percent for every foot that the ball goes by the hole, which is the cause of lip-outs.

Take the guesswork out of green reading and consider the use of an evidenced-based approach. Thank you, Col. Templeton, for your service to our country and contribution to the game of golf!
Putter Fitting

Putter Fitting

By Bert Jones, USGTF Member, Loomis, California

Putter fitting is a no-brainer. Putting with an off-the-rack putter is like competing in the high jump from a ditch. Getting fitted for a putter allows you not to be disadvantaged by your equipment.

There are two options:
  • Have a custom putter built for you.
  • Find a putter that fits your eye and putting stroke, and then have a club fitter tweak it for you.
  • Off-the-shelf putters are not designed for optimal putting, as they are built on the mass-production principle of one-size-fits-all. It is possible to putt the ball straight with an ill-suited putter, but the odds are stacked against you when it comes to consistency. Your equipment should fit your putting stroke. It is important to get custom fitted. Below is some key information to consider:

    Putter length should fit the player. A more upright stance will yield a longer shaft and a more pronounced arced putting stroke. Most putters off the rack are 34-35 inches long. SeeMore Putters offers 13 options ranging from 31-37 inches with ½-inch increments.  Players with a straight-back straight-through motion will have a bent-over posture, requiring a shorter shaft. If the putter is too long, you will stand farther from the ball and your eyes will be well inside the ball at setup. The plane of your putter path will be flatter and the toe of your putter will be off the ground, pushing your aim to the left. To accommodate the extra length, you will have to cramp up your elbows too close to your body, rather than let your arms hang naturally under your shoulders. If the putter is too short, you will stand closer to the ball and your eyes will be beyond the ball. The plane of your putter path will be more upright, as your putter shaft will be more upright. The heel of your putter will tend to lift off the ground, causing it to aim to the right. A putter that is too short for you will cause you to crouch over, putting added pressure on your back. It will restrict the smoothness of your stroke.

    Lie angle for most off-the-rack putters is 70-72 degrees. The higher the number, the more upright the shaft. If the toe is upright, you will see putts pulled to the left, and if the heel is upright, you will see putts missed to the right. Try inserting your business card under the toe and heel to check. Your card should slip just under the toe and heel if the lie is correct. Tour pros have lie angles ranging from 63-78 degrees. (The maximum and minimum standard is found in the USGA Rules book under the appendix section.)

    A good setup can prevent this problem. An incorrect lie angle could also cause a slightly less solid contact, and poor energy transfer will make distance control more difficult. The most important aspect of the lie angle is that it promotes good posture and eye position over the ball. The length of your putter and the corresponding lie angle are related. The longer the shaft, the flatter the lie angle should be. The shorter the shaft, the more upright the lie angle should be.

    Loft – Off-the-rack putters range from 2-4 degrees. The goal is to prevent skidding and bounce once the ball is struck. You must ensure that you do not press your hands forward during the stroke, which will result in de-lofting of the putter. Both issues will create loft problems, which affect distance control. The loft of a putter is the angle formed by the putter face and a level surface when the putter is held in a neutral position at address. It is measured in degrees. You need some loft to lift your ball out of the shallow depression caused by the ball’s weight and onto the top of the grass for a truer roll. Too much loft can jeopardize distance and directional control, as the ball will tend to bounce after impact. With too little loft, you will compress the ball into the turf with the same undesirable effects. You need more loft for slow greens, and for fast greens you need less loft.

    The way you set up and putt can alter the dynamic loft of your putter. For example, when you position your hands well forward of your ball or forward press at the start of your stroke, you effectively decrease your putter’s loft. Even a variation in ball position can change the dynamic loft at impact. My preference is not to mess with the loft during putter fitting, but concentrate more on achieving a more neutral hand position. However, if you need to use a forward press to trigger your backstroke, the club fitter may decide to adjust your putter so that the loft at impact remains within the parameters of two to four degrees.

    Balance (toe hang) of the putter should match the putting stroke. There are three types of putting strokes: straight-back to straight-through; arc-to-straight-through, and arc-to-arc. For example, a mallet putter is more face-balanced and matches a straight-back straight-through putting stroke.

    Alignment aids on the putter must send a player a calm and confident message. First, it helps you to square your putter face to your aim-line. Secondly, it helps you to line up the sweet spot on your putter with the center of your ball. Miss the sweet spot and your distance control can be thrown way off! Some putters are easier to line up than others. In my opinion, sight lines are better than circles, as their straight edges offer a sharper contrast. However, there is no alignment aid that will help all players. You need to experiment to see which element helps you to aim better. It is a matter of preference.

    Putter weight is important. A heavy putter can help quiet the hands; however, a lighter putter allows your students to have a lighter grip and remove tension in the hands and wrists. Tension reduction aids in the reduction of adrenaline into the forearms. (Tension and adrenaline are killers. They increase the yips and create problems with distance control.) Be careful. I have seen some people who add crazy fat grips that radically change the balance point on the putter. The longer the putter, the heavier the putter head will feel. Putter weight is a very personal preference. There is no standard head weight for a putter. It can be anything nowadays. The relationship between the length, the head weight, and the overall weight of the putter varies from manufacturer to manufacturer and by model. In theory, the head weight should change to keep the same relationship of head weight to grip weight when you either shorten or lengthen the putter. There is a school of thought that you should use a heavy putter to putt on slow greens and a light putter to putt on fast greens. There are some putters on the market with adjustable head weights, but to me this is just an added complication.

    Shortening the shaft stiffens it and changes the overall weight of the putter, but I have found that the change in feel is not that great. It is far more important that your putter has the right length and lie angle for you. Otherwise, you are never going to putt consistently. If you are not 100 percent satisfied with the balance of your altered putter, the club fitter can change the balance point to suit you by either adjusting the weight under the grip or by applying lead tape to the putter head. Custom fitting is not just for your driver, fairway woods and irons. The club you use most is your putter, and it is one of your main scoring clubs. Proper putter fitting will allow you to putt with more confidence and get better results.

    Feel is another preference. It breeds confidence. Milled and cast putters create different feel, and some putters provide a different sound when the ball is struck. Always practice with the same kind of golf ball. The ball construction transfers feel, which affects putting stroke rhythm. Different types of golf balls have an effect on putting feel. There’s a lot of debate among the golf community about how golf balls affect your putting, but we won’t get into the arguments/discussions that people raise about this subject. Instead, let’s look at the factors that most people pay attention to in their putting stroke. The sound of the golf ball as it comes off the clubface stands out to some golfers and causes them to find a golf ball that’s charming to their hearing. More expensive golf balls like the Titleist Pro V1 and Pro V1x have been known to produce a soft thud, whereas cheaper golf balls or even plastic-covered golf balls tend to give a high frequency “ping” sound that can become annoying or distracting. Feel is how solid the golf ball feels when the clubface hits it.

    In the end, though, golf balls mainly matter for off the tee, and also your approach shots all the way up to being on the green. Once you’re on the green, it’s hard to prove that a golf ball has an effect on your putting stats. You’ll improve more by focusing on distance control and accuracy than what ball you’re putting with. You can argue that feel, such as the soft thud or hard thud, can affect your ability to sense distance control, so therefore shop around until you find a ball that works for you off the tee as well as feels good on the green. As for inserts, if you look at the face of a putter, you will notice that some have a face insert of a different material and others don’t. There are several reasons for an insert:

  • To remove metal from the center of the putter head to increase perimeter weighting.
  • To provide a softer feel on the putt at contact enhancing feedback, both auditory and tactile.
  • To eliminate any possible waviness on a putter face that has not been milled.
  • For golfers using a two-piece distance ball to juice up their drives, an insert can compensate for the harder cover material. I have used putters with and without inserts, and I don’t think you should factor in too much importance to an insert. There are other more important features to consider when choosing a putter.

    Grips are divided into two groups, pistol grip and paddle grip. There are fat grips and thin grips, firm grips and soft grips. The grip type should fit how the player holds the putter (for example, a pencil grip is what I use). A thick grip can address those with a dominant right hand, whereas a thin grip can help relieve tension in the forearms. The grip is the only connection that your hands will have with your putter. If your putter length needs to be adjusted, it is a good time to consider the type of grip you prefer, and have the club fitter fit it for you during the putter fitting session. Conventional thinking equates thin grips with a wristy stroke, with the shaft placed in your fingers. Fatter grips put the shaft more in the lifelines of your hands, giving you a steadier hold on your putter as well as promoting a shoulders-and-arms pendulum-like stroke. They help to prevent your wrists from breaking down during your stroke. Off-the-shelf putters use a standard paddle rubber grip of about 11 inches with a flat front flange so that you can place both your thumbs on top of the shaft, one under the other. If the grip has been properly fitted, the flat part should be 90 degrees to the putter face. I prefer an oversize grip as it allows me to place both thumbs on the shaft side-by-side. This balances my hands on the putter and levels my shoulders. There is one small disadvantage of an oversize grip in that your putter may not fit into putter tubes in your golf bag.

    Putter shapes have three basic shapes to consider: classic blade putters; heel-toe-weighted putters, and mallet putters that are usually face-balanced (that is the one I use, because I have a straight-back straight-through putting stroke). Each putter shape has a different distribution of weight. A rough-and-ready way to check this is to balance the putter on your extended finger under the shaft near the putter head.

    Classic blade putters – for example, a Ping Sedona – are great for an arc-to-arc putting stroke because the putter has a heavy toe hang. Heel-toe-weighted putters – for example, a Ping Anser 2 – hang at a 45-degree angle (4 o’clock) to the ground. This is a good choice for an arc to straight through putting stroke. Mallet putters – for example, the Odyssey Two Ball – are usually face-balanced, with the putter face pointing to the sky. It’s an excellent choice for the straight-back straight-through putting stroke.

    The choice of putter head shape and weighting is a matter of preference. In terms of playability, the classic blade putter is the least forgiving on off-center hits. Heel-toe-weighted putters still dominate the off-the-shelf market and are popular with golfers whose stroke path is inside-square-inside. The weight at the heel and the toe is greater than that at the middle of the putter head. This heel-toe weight distribution works to stabilize the putter head on contact with the ball and is more forgiving on mishits. Mallet putters, with their larger and heavier heads, favor a stroke path that is more square-to-square or inside-square-square. In a face-balanced putter (a common feature of mallet putters), the center of gravity is in the same plane as the shaft. Therefore, during the transition from backstroke to forward stroke, there are no dynamic forces to either open or close the putter face.

    MOI–MOI stands for “moment of inertia” and refers to how easily the putter face twists during contact if you mishit the sweet spot. As MOI increases, the importance of center contact on the putter face goes down. An amateur is likely to have more mishits towards the heel or the toe of the putter than proper contact on the sweet spot. When you hit a putt off-center, you are sacrificing a degree of distance and directional control. Increasing the putter head size is a common design feature to compensate for any mishit.

    There are a number of large-headed putters on the market. The putter head may often appear ugly and the look may not fit the eye of many golfers. Nevertheless, the design increases the MOI and helps you to minimize the effects of a mishit. If you prefer the more traditional look, it makes more sense for you to putt with a heel-toe-weighted putter rather than a blade putter. This is because the MOI is about three times greater, even though both head weights are the same. The playability factor is simply better.

    By the way, be sure to name your putter, because it is the most important club in your bag!