Teaching English-Language Learners

Teaching English-Language Learners

By Ben Bryant, MA – USGTF Certified Golf Teaching Professional®, Tampa, Florida

It’s been a rough year for Puerto Rico. Two major hurricanes this summer – first Irma in early September, then Maria a few weeks later – devastated the people and infrastructure of the 50-mile wide U.S. commonwealth. Progress to restore the island’s electrical grid has been slow. Six weeks after the storms, as much as 95 percent of Puerto Rico’s 3.5 million residents remained without electricity.

With fears that the recovery will stretch into months and even years, many Puerto Ricans have decided to leave the island. Every day, dozens of airplanes leave San Juan filled with Puerto Ricans who may never return. More than 80 percent of those airplanes are headed to Florida, where the governor has declared a state of emergency in order to free up money to help those fleeing the island to relocate.

More than 100,000 Puerto Ricans have already moved to the mainland. As a golf coach and instructor living and working in Florida, I consider it important how best to serve this large population of new potential clients. Only 20 percent of Puerto Ricans speak English fluently. For me, it’s been fairly commonplace to conduct a group lesson or summer camp session where one or more students are English-language learners (ELL). Using the following strategies can help make the experience a mutual learning opportunity:

Use non-verbal cues

Although you might not speak the same language as your student, there are some fairly universal non-verbal cues that you can use to communicate. Hand gestures, proximity and the tone of your voice can convey a great deal of information. Using images or drawings might also be useful when trying to deliver instruction. I use a laminated Rolodex-style pocket-sized photo guide, and I have found this to be immensely helpful.

Rate of speech and wait time

ELL students in the process of learning English have the challenge of listening to what you are saying, and then interpreting as best they can back to their native language. It can be difficult to listen and process at the same time. It is often useful, as he instructor in this situation, to be aware of how quickly you are speaking. It isn’t necessary to slow down to a snail’s pace – this could be perceived as condescending – but being aware of your rate of speech is important. Additionally, you will want to provide a beat or two more of wait time between questions and responses to allow your students to go through their process.

Model exercises and drills

This should be a pretty simple one for golf instruction. A good golf teacher should already model a new skill or drill so their students can see how it should be done correctly. In modeling a drill or exercise with ELLs, be sure not to simply stand and lecture. A lengthy verbal explanation is likely to not be well understood. Conversely, break up the drills into smaller steps with short explanations to allow your student to keep pace.

Check for understanding

In a lesson where there is no language barrier, checking for understanding is already an important teaching skill, but it becomes vital with ELL students. It’s an excellent idea to implement a non-verbal cue system to check for understanding. For example, implement a thumbs-up, thumbs-down arrangement or some other method. Remember that head nods tend not to work well, since many ELLs, when asked, “Do you understand?”, will nod their heads “yes” as a way of being polite.

Develop your own golf/Spanish vocabulary

You may not have the time or predilection to learn an entire language, but perhaps you could make the time to learn at least the vocabulary that pertains to golf. In Spanish, the word “golf” itself is already a cognate (meaning it is the same in English and Spanish), so that one’s easy! El palo de golf, la pelota de golf and el campo de golf shouldn’t be too hard to memorize (golf club, ball and course, respectively). Having your own arsenal of golf terms can help you form the basis of communication with your student, and they will appreciate the effort.

25 Degree Golf

25 Degree Golf

By Arlen Bento Jr. USGTF Member Jensen Beach, Florida

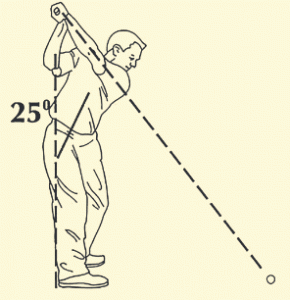
One swing required with 25 Degree Golf!

Have you ever asked yourself why golf irons are made the way they are? Why are lofted wedges shorter than the lower-lofted long irons?

What if I told you that your traditional sets of irons are wrong and that there is a much better way to play golf? Would it perk your interest? If yes, then you are going to find this article very interesting.

Here’s my background, in case readers don’t know me: My name is Arlen Bento Jr., and I am an award-winning golf coach and WGTF Top 100 Teacher. I have been contributing articles to the USGTF for nearly 20 years and I own and operate a golf instruction and internet marketing empire in Stuart, Florida. (Well, it’s not really an empire.) I am the former head golf professional at PGA Country Club in PGA Village, Florida, and I have multiple national awards in the golf industry.

About a year ago, I was introduced to an idea that I had actually used when I first started playing golf as a professional – single-length irons! The concept of single-length irons, one ball position and one swing plane made a lot of sense to me. At the time, I played a set of Tommy Armour EQL irons and loved them. I was playing good golf and started to take them to my events, and got ridiculed by my contemporaries. They made fun of me and said my game was no good and that is why I needed single-length irons; it was cheating because no one else had a set made that way. Alas, I was young and succumbed to peer pressure, and went back to a set of forged blades like I was supposed to play. I can’t believe I did that as I don’t consider myself a follower, but I did.

Fast forward to 2016. Bryson DeChambeau explodes on the golf scene playing – guess what – single-length irons. Now, before you start jumping ahead, thinking that this article is just about single-length irons, stop. That is not what this article is about; well, not entirely. It’s more about how I got the idea that I am going to share with you.

My idea is called 25 Degree Golf!

I was involved in a project and was working on a concept designed to stand up golfers in the setup position. The idea was simple: Why bend over and put your body into a completely non-athletic position? Nobody walks around in comfort bent over 45 degrees, like many people are in the golf swing.

So many professional and avid golfers are suffering from aching backs and injuries that can be attributed, in many cases, to lower-back stress because of the golf stance and the swing that it creates. The problem is that it was impossible to get students and players into a more athletic and upright spine-angle position with traditional golf irons, because their irons were just too short.

Your irons are too short!

So I asked myself, why? With a traditional set, all iron heads have different weights designed to work with different-length shafts. Lofted irons have heavy heads to make up for shorter shafts; less-lofted irons have less head weight to make up for longer shafts, and that is just how they are done.

I started introducing some of my students – the ones that had been losing distance, not making solid contact, no accuracy, and most of all, sore backs – to longer single-length irons.

All I did was make their lofted irons the same length as their 4-iron, and pow! Lightening in a bottle! More distance, solid contact, more accuracy, less back pain and better golf.

I had students take out trial clubs and come back raving about 180-yard 6-irons and being able to reach par-3 holes with a 9-iron for the first time in 20 years. What really got my attention was all the students that I put into these single-length longer irons came back to see me with an incredible result: They picked up distance with their driver!

I scratched my head about this for a month. I looked at their swing videos before I made their irons longer, and then after I made their irons longer. It hit me like a ton of bricks.

Their spine angle was staying in the same place! There was very little difference between their spine angle with their irons and their driver, and for that matter, fairway woods. Because their irons were long, they maintained a similar spine angle, thus a similar swing plane, and a new confidence in the irons translated to better swings and more confidence with their drivers. Whoa!

As I looked at the swings, I noticed that each player had a spine angle of 25 degrees. So I named my concept 25 Degree Golf. I knew I was on to something, but I needed better equipment. I knew that making heavy lofted clubs longer was making the club feel and play different. So I picked up the phone and called Cobra Golf. They were on board in five minutes.

Cobra had invested over $40 million in single-length iron technology and Tour superstar Bryson DeChambeau. They were thrilled to work with me, and now we are a partner with the USGTF.

For those of you that are thinking, this can’t work, or the clubs will feel heavy, stop and think: Heavy compared to what?

Can’t work because, why? I have found that motor skills are easy with a more upright spine angle. Concerns about chip shots and delicate shots are put to rest with choking down on the clubs for comfort. If you never played a round of golf with a traditional set of irons, would you even question a single-length set that was made to keep your spine angle in a similar position? The simple answer is no, you would not!

What you will notice when you create a 25 Degree Golf set of irons is much higher ball flight compared to what you were used to with a traditional set. You will see a lot more distance and will experience a sensation of not having to rotate your wrists as much in an attempt to square your clubface at impact.

With all your irons at the same length, your need to create shaft lean and a downward strike are minimal. You will hit the golf ball with effortless power and effective loft, creating high, accurate shots.

Worried about the wind? Just move the ball back in your stance and choke down on the clubs an inch or two and there you go.

Swing mechanics are very simple. All you have to do is make a full turn into the backswing (get your back to the target), which will keep your hands on a flatter plane, and strike the ball like it is sitting on a tee. You really don’t need to get the club up near your head, but it works either way after just a bucket of balls. You will feel the club’s face strike square and true while creating a feeling that the club is staying on your target line a lot longer than your traditional set of irons.

I know this might sound a little crazy, but I have been teaching golf for over 20 years and I remember pros calling Karsten Solheim crazy, Ely Callaway crazy, TaylorMade metal woods crazy, carrying four wedges crazy, big-headed drivers crazy, big-headed putters and hybrids crazy, Surlyn golf balls crazy – you get my drift!

All I know is that I have a lot of players asking for 25 Degree Golf irons. All I know is that people are telling me that 25 Degree Golf has given them back their golf games.

I hope you take the time to give this idea a chance. It might not be for everyone, but for some, it could be a game changer.

Arlen Bento Jr. is an award-winning golf coach, WGTF Top 100 world-recognized golf instructor, USGTF Master Golf Teaching Professional and entrepreneur. He is the former head golf professional of the PGA Country Club at PGA Village, Florida, and the former director of golf at Eagle Marsh Golf Club in Jensen Beach, Florida. Bento has three national golf operation awards in the golf industry, including two Golf Digest Four Star Awards and a Service Ace Award from Golf Shop Operations magazine. He offers golf instruction at his indoor golf studio in Stuart, Florida, and at the Champions Golf Club at Summerfield.

Bento is a proponent of skills-based golf learning, slow-motion golf learning, single-length golf irons and dynamic club fitting. He is the owner and operator of College Golf Pipeline, a college golf recruiting service that helps junior golfers find college golf scholarships, and co-hosts the Golf Talk Florida radio show. He can be reached on his website www.ArlenBentoJr.com, or by email at arlenbentojr@gmail.com. You can also give him a call or send him a text at (772) 485-8030.
Get Your Students Into The Zone

Get Your Students Into The Zone

By Dr. Gregg Steinberg USGTF Sports Psychologist, Nashville, Tennessee

Everyone wants to be in the zone. The zone is this magical, mystical place in which you feel so confident, your focus is so sharp and your emotions are completely calm. The zone is being at your best in whatever you are accomplishing. It would be wonderful if we can help our students to get into the zone as much as possible on the golf course.

Here are two easy steps to helping students to get into the zone more often:

1) Become aware of their zone experience. Your students need to be aware of which emotions occur during the zone experience.

2) Emotionally prepare for the zone state. Your students will need to develop a personalized routine that will help them get into the zone more often.

The zone experience is unique to everyone. Some individuals may be highly anxious when they are in the zone, while others can be very calm. Some individuals will be thinking a lot when they get into the zone, while other individuals have a clear mind.

There is not one set pattern of emotions. Thus, our students need to be aware of their individualized zone template. This process is known as self-monitoring and is essential to developing a clear understanding of their zone experience.

To help your students become aware of their zone template, the instructor needs to have the student address two different situations. First, ask your students to recall a time when they performed at their best. Then, the teacher should ask the following questions related to five levels of this particular “best” performance state:

1) Was your nervousness level high, medium, or low?

2) Was your confidence level high, medium, or low?

3.) Was your energy level high, medium, or low?

4) Was your enjoyment level high, medium, or low?

5) Were you thinking or just reacting?

To develop a better understanding of the zone state for your students, the teacher should ask a question about the contrasting situation. Students should recall a time when they performed at their worst. Again, this can be in the sport of interest or in a different performance situation. The teacher should also address the same five levels of this “worst” performance state, asking the same five questions listed above.

This set of questions concerning contrasting performance situations – best vs. worst – will give teachers all the information they will need to understand their students at a deeper level. For instance, some students may perform at their best when they have low energy and at their worst with high energy, while a different student may be at their best with high energy and at their worst when their energy is low. Or, one student may be best when they are reacting and perform at their lowest when they think too much, while a different student follows the opposite pattern. Gaining knowledge about best vs. worst performance is essential before moving to the next step.

Emotionally preparing for their zone state. The next step of this process is to replicate the emotions of the zone state for the student. There are three ways to help your student accomplish this:

1) Create an emotional buzzword that represents that zone state.

2) Create a behavior trigger associated with that zone state.

3) Use a visual image that represents that zone state.

Emotional buzzwords help to elicit the same emotions that the student felt during their zone state. As an example, I had a high school golfer, Ron, describe his zone state to me. When he described it to me, he said he felt extremely aggressive and confident, like nothing could shake him. When he performed at his worst, he felt he lost confidence and he was very passive, with low energy. I suggested the cue word “bulldog,” and he loved it. Ron said that is exactly how he felt at his best, like an aggressive bulldog on the mound.

I then asked Ron to describe how a bulldog would feel. He said that a bulldog would always keep his head high. So for Ron, we created the behavior trigger of “chin up.”

I then asked Ron of a visual image that reminded him of when he was confident and aggressive. He said he had a picture of himself smashing one of his longest drives. I told him to put his picture on his phone (he had one of those fancy iPhones), and to look at this picture as much as possible. But more importantly, when he looks at this picture, Ron is to recall feelings of confidence.

The last step is to create a personalized routine. That is, Ron is to put all three processes (buzzword, behavioral trigger and image) into his pre-shot routine. Specifically, at the start of Ron’s routine, he is to say “bulldog.” As he says this, he is to get his chin up, and then he is to recall that image of him smashing that long drive. All three will help him instantly get into the correctional emotional state for his upcoming shot.

To help your students play at their best, help them become aware of their best (zone) state and then help your students create a personalized routine that will lead to their most effective emotions. This is a simple but incredibly powerful method that will lead to your students playing their best golf.

About the author: USGTF member Dr. Gregg Steinberg has been recognized by Golf Digest as one of golf’s great sports psychologists. He has been a frequent guest on Golf Channel to speak about sport psychology. He is the sports psychologist for the USGTF. Go to www.MasteringGolfPsychology.com to become a certified mental game expert by the International Golf Psychology Association, sponsored by the USGTF.
A Strong Grip = Slicing… And Other Teaching Paradoxes

A Strong Grip = Slicing… And Other Teaching Paradoxes

By Mark Harman USGTF Course Director, Ridgeland, South Carolina

When I’m not executing my duties for the USGTF, I spend my time teaching this great game that we all love. The other day, a student came to me, saying he was hitting his driver all over the lot, but he especially struggled with a slice. It didn’t take but one swing to easily see what his problem was: He was slicing the ball because he had a very strong grip.

Wait a minute, you might say. What do you mean he was slicing because he had a strong grip? Everyone knows a strong grip leads to hooking the ball!

In most cases that would be true. But there are those golfers who use strong grips and almost never hook or draw the ball, and struggle with slicing. These players tend to be good athletes with decent motions. They can kinesthetically sense that any sort of release with the grip they have could lead to a drastic hook, so they have learned to block their release and prevent the ball from hooking, or even drawing.

Examples in professional that come quickly to mind would be David Duval and Paul Azinger. Both employed a very strong grip with closed clubfaces at the top of their backswings. And interestingly, both faded the ball. They used a fast body rotation throughout the forward swing and a holding off of the release to do so, because a normal release would result in a severe hook. Even a nominal release would result in timing issues, so a fade works best with extremely strong grips.

Players like Duval and Azinger were talented enough, and put enough practice in, that they were able to reach the pinnacle of the game as major champions. But my recent student, while a good athlete, was of course nowhere in their league. While he had enough kinesthetic intelligence to hold off his release to prevent a hook, occasionally he couldn’t hold the release off, and a drastic hook would result. The cure was to give him a neutral grip and get him to release the club fearlessly. He did hit a number of good shots, but I stressed that the changes I was asking him to make were not quick fixes, and would take several weeks, if not months, before he saw some consistency.

That led me to thinking about other teaching paradoxes. Here’s a brief list:

A faster backswing is better than a slow one.

We often hear our students say they “swung too fast.” As noted teacher Hank Haney likes to point out when he hears this, “What? You want to hit the ball shorter?” But often the student is referring to his backswing. And a lot of teachers buy into the “slower backswing is better” school of thought. Infact, studies show that most amateurs actually swing back slower than do the pros, and often considerably slower. A faster backswing has more stability than a slow one – think of a gyroscope. The swing should not be jerked back in order to become faster, but a smooth, quicker backswing can help many players.

A closed stance can lead to slicing.

When I first started teaching, I believed that slicers inevitably had an open stance in order to compensate for their slice. I was also taught that an open stance promoted a swing path to the left of the intended target line for a right-handed player. You also saw this belief printed in the pages of all the golf magazines.

However, when I started teaching, I quickly noted that about half of my slicing students had a closed stance. These golfers often have great backswings as they follow their stance line, but they re-route the club in an over-the-top move to start the downswing. The result is that while they are now swinging towards the target, as they should and as they are attempting to do, they are also swinging outside-in in relation to their alignment. Thus, a slice is born.

In the same family of alignment errors, you also will see some good golfers fight a hook from an open stance because they are swinging towards the target, resulting in an inside-out swing path through impact.

Better mechanics may lead to poorer results.

Golfers with certain swing errors may have their compensations grooved so deeply that fixing the main fault may make them worse, because they are unable to rid themselves of these deeply-embedded compensations. This can be a real problem for the teacher, but one way I’ve found my way around it is to observe what they do on a good shot vs. what they do on a bad shot, and reinforce the behavior that produced the good shot.

A longer club may produce shorter shots.

In the early 1990s, I saw an article that said if a golfer could not hit their driver more than 150 yards, they would actually hit the ball farther if they used a 3-wood. Although I had a hard time believing this, I reasoned then that if this indeed was true, it must be because the golfer didn’t hit the ball hard enough to let the aerodynamics of the ball kick in. With today’s knowledge gleaned from launch monitors and a better understanding of the science behind this, we can see that my rudimentary explanation back then is actually pretty sound today.

I learned in my college physics classes that a projectile launched at 45° would produce the greatest distance. But in golf, when we introduce the concept of lift due to a spinning ball, the optimal launch angle for maximum distance depends on the ball’s initial velocity and amount of spin. In general, a golfer with lower ball speed will need to launch the ball fairly high to achieve maximum distance, while a golfer with faster ball speed will likely need to launch it somewhat lower.

So when your short-hitting students say they hit their 7-iron farther than they hit their 5-iron, believe them. No amount of instruction will overcome this fact of physics. They can probably benefit from adding hybrid clubs to their bag, clubs with lower and deeper centers of gravity, to help them launch the ball higher. A 3-wood may be virtually useless off the ground, so a 5-, 7-, or even a 9-wood can be a better option.

In conclusion, we can see that not all golf instruction tenets are cut and dry. Conventional wisdom can only take us so far, and when it doesn’t apply, we have to have the knowledge and be creative enough to handle the curve balls that some students will throw in our direction.
Teaching Outside the Box

Teaching Outside the Box

By David Vaught USGTF Master Golf Teaching Professional® – Vista, California

As often happens in other sports or even walks of life, humans tend to naturally repeat behaviors or actions they see at a young age. Far too often, we accept the “way it’s always been done” as our excuse for continuing to do things the same way we have experienced it or seen it done.

As this relates to golf, and more specifically golf instruction, we should ask ourselves why the average lesson looks basically the same today as it did in 1950: Pile of balls, a set amount of time, teacher one-on-one with a golfer hoping to improve, or at least enjoy the game more. For the most part, it is like getting your haircut or getting a manicure. Granted, we do have more technology and more crazy devices than our golf teaching ancestors did, yet essentially, we have just accepted that the 30- to 45-minute lesson on the range is the way you do it. Why do it differently than it has always been done?

If we are truly honest with ourselves, it is just easier to follow the herd. Yet, we see professors and successful instructors in our schools and universities changing and evolving instruction every day. Go into an accomplished teacher’s classroom today and you may not recognize it is school! Your first reaction is to think, what is wrong with the way I learned English or math, a book, a teacher talking at me and me learning verbally? My answer is a lot iswrong with that! People learn all sorts of ways, and golf instructors need to recognize that.

Golf has a history of being behind the times in many aspects. I often like to joke that in golf we are now at about 1980. As an example, we see the USGA and the R&A contemplating big rules changes today, which is very refreshing.

It is important that instruction continues to improve and develop. Challenge old teaching techniques and ideas. That should be your objective as an instructor. How can I reach and assist more students? How can I get them to be excited about learning? How can I improve the experience?

We often think of technique expertise when we imagine what the substance of a good lesson is. And that is valid. But the structure of the lesson, the environment, the adaptive teaching style to the student is just as important. Contemplate your lessons and think outside the box. Help move golf forward into the 21stcentury. After all, we are 18 years in already.

Supervised Practice Times:

Post the times that your paying clients can practice with your supervision. Maybe it’s 6-7p.m., three days a week. Whatever works. Charge a small fee if you feel the need. You are verifying how and what they should be practicing, not giving a personal lesson.

Begin a once- or twice-a-month play league with your paying clients:

Create competition, which will allow you to observe them in a playing setting. That alone will help you tremendously as an instructor if your goal is to help them improve. Nothing brings out “real” like some competition. Plus, they have a great time.

Short Game Competitions:

Use your imagination and set up games, leagues, etc., around the short game for your regular clients. Give away free lessons if they bring a friend. Maybe even putting leagues and challenges. Everyone loves to putt, and you could video their technique under pressure to sell more putting lessons.

Playing the Game Observations:

For beginners or curious golfers, create a once-or twice-a-month follow-along, with the teacher actively on the golf course. They come out to watch you play as you explain the basics of the game for two or three holes. Bring your favorite student along who will help you and be your best advocate. They learn more about what the game is all about, and you create new students.

From these ideas, you get the point. The possibilities are endless. Supervised practice is a great way to help them and to create loyalty with your students. Just use your imagination and remember it is not 1950.
Balls

Balls

By Norm Crerar USGTF Contributing writer – Vernon, British Columbia

I am a casual golfer. I was a 10 handicap at one time, but now am a lot older, creakier and crankier; the handicap is now a multiple of what it once was. As I have mentioned before, I have been teaching skiing for 50 years (some of those years with your esteemed USGTF president). I take golf lessons and really enjoy not only fixing my swing, for at least a short period of time, but discussing the nitty-gritty of teaching and how to be most effective in helping people improve. I read too many golf magazine articles and access too many golf tips on the internet. I have to take a break once in a while and “smell the flowers.”

I also have to confess…I am a bit of a golf ball hound. The resort course my wife and I are members at here in British Columbia, has a lot of knee-high grass next to many of the fairways that would please the eye of any hay farmer. Where there aren’t hay fields, the fairways are surrounded by park like wild lands of trees and shrubs. I have been intimately involved with just about every aspect of this wonderful off-fairways nature offering. When I am having one of those handicap-altering days and am asked, “How was it?” my answer is in the positive: “I had a great day. Lost 12 balls but found 15!”

So, I collect these golf balls and wonder what story each one has to tell. When I need a brain break, I quite often wonder into the tall grass areas near the first tee of one of our resort’s courses. There are always golf balls to be found there, and in great numbers. Golfers, especially out-of-town visitors, are more prone to “first-tee jitters” than regular members. They grip the club too hard, swing too fast, rip it off the top, have 10 too many swing thoughts, and the ball is into the grasses. Do they go looking for it? Most times not as the grass is thick, too far from the cart path, and their buddies have just picked themselves up off the tee box from laughing and loudly telling their friend his “skirt got in the way.” Or, the golfer took a mulligan, the second ball hit the fairway and his playing partners have moved on and are not about to wait for him.

Most of the balls I find off that first tee are brand new. Who would think of not using a new ball to start a golf outing? Many have corporate logos on them. I don’t feel bad pocketing these items as they are usually from a tire company, a car company, an insurance company, etc., where I have spent heaps of money. They didn’t give me any FS (free stuff), so when I pick up the ball, I feel like it belongs to me as I have already paid for it!

Then the wondering sets in. This ball is way off-line. Was it a left-handed golfer slicing, or did that right-handed golfer absolutely yank it? How hard did they swing and how disappointed were they right off the first tee? How was the rest of their day? Was this ball – 50 feet off the tee and 50 feet right – from the cigar-puffing chubby chap with the bad shorts and socks pulled up too high I saw on the driving range? And whom I heard talking about the “Titleest schwag” he got instead of “Titleist corporate gifts”? Or this pink ball 280 yards out and 30 yards right? Did a lady golfer actually hit it that far, or was it one of those NHL hockey lads at the course today that had run out of ammunition or had lost a bet?

There is a member at our club who has had to stop playing golf due to a debilitating illness. His only physical attachment to the golf course is when his wife takes him out in the quiet evenings and they look for golf balls near the fairways. The word is he has found some thousand golf balls. Therapy for him.

As a golf teaching pro, your students may need some therapy time. Suggest that the next time they hit it off-line they should spend a few minutes to find the ball. Chances are they will find two more and know that the people leaving them behind were having a worse day than they were!
Education Of A Golf Teacher

Education Of A Golf Teacher

By Mark Harman USGTF Course Director, Ridgeland, South Carolina

What does it take to become an excellent golf teaching professional? Certainly, there are a number of aspects that come into play, among them playing skill, a desire to learn and help others, and a motivation to become the best one can be at this craft.

USGTF Master Teaching Professional David Vaught from Vista, California, one of the most respected members in our organization, has stated that one of his main motivations for being the best he can be is the desire to never give a bad lesson. In talking with David, you get the sense that he takes what he does for a living very seriously, and it comes through in his interactions with his students. He is undoubtedly one of the most knowledgeable people in regard to golf and the teaching of the game that I have come across.

Another professional who I have always been highly impressed with is CGTF professional David Hill from Montreal, Quebec, Canada. When I hear him speak about the mechanics of the game and its techniques, it’s clear that he has a knowledge well above and beyond that of a large majority of teaching pros whom I’ve encountered. I know how rigorously he has studied the game over the years, which is probably the key to his success.

For me, I started teaching the game in my mid-20s, and although I had a good grasp on the mechanics and some basic cause and effect, I had no practical knowledge teaching the game, save for helping out acquaintances and my college team-mates. I was tasked with instructing beginners, an excellent way for someone to get their feet wet in teaching if they have no formal training. In addition, I had a whole stable of talented and experienced golf teaching professionals from whom I could ask advice, and I wasn’t shy with my myriad of questions.

Still, it took me a couple of years to become what I would consider competent on the lesson tee. I still use a lot of the knowledge today that these fine teachers imparted to me many years ago, but learning to teach golf in this manner is somewhat of a random crapshoot. Had my fellow teachers not been competent, or had they unconventional ideas that didn’t stand up to logical scrutiny, I might have been forced out of the profession long ago.

After these couple of years I mentioned earlier, it became clear to me that there were several basic teaching concepts that presented themselves over and over in every lesson, which is where the USGTF comes into the picture. At the time, the USGTF was rapidly growing beyond what had been initially foreseen, and more golf teachers were needed for the examining staff. Fortunately, I was recommended and my career with the USGTF started in April 1991 at Lehigh Acres, Florida.

The USGTF was unique in that it welcomed all who were competent and confident enough in themselves, instead of requiring an apprenticeship of several years that had little, if anything, to do with teaching. It also for the first time put together a structured program that featured these teaching concepts that took me several years and hundreds of hours of lessons to learn on my own, but in fact could be taught in a matter of days.

As my journey as a USGTF professional continued, I realized I had an obligation to learn as much as I could about various teaching techniques and the methodologies of leading instructors. Nothing was off the table: From full-swing mechanics to short-game skills, from the mental game to motor learning, I knew I had to make an effort to become not just competent, but as good as I could become. It also required me to closely study new schools of thought and not to get entrenched in long-held beliefs that may or may not have been valid.

It also required me to learn something from each and every lesson. Sometimes these takeaways were, and still are, harsh. There are times where I have been utterly unable to help a student, de-spite my best efforts. It is after these lessons that I often wonder what I could have done to better get through to them, to get them to understand how to translate my words, pictures and drills into a feel they could kinesthetically comprehend. I wonder where I went wrong and if there was something I could have done to save the lesson.

Then I remember that no less than David Lead-better and USGTF member Bob Toski, two of the most revered names in teaching history, have ad-mitted publicly that there are times that they, too, have been unable to help certain students for what-ever reason. So I figure if it happens to the best of us, it probably happens to all of us, regardless of our skill or experience.

I remember the late Julius Richardson, the US-GTF’s Teacher of the 20th Century, giving a lady a brief lesson. I mentally went through her mechanical faults as I was watching this and wondered what he would address first. Much to my surprise, he told the lady to relax her shoulders at address. What? That’s it? Certainly that can’t be right, Julius, come on! What about her grip, her backswing and forward swing?

But you know what happened? That lady smacked the heck out of that next ball she hit, and she was so excited. She repeatedly hit shot after shot in a similar manner, and afterwards gave Julius a big hug.

What exactly he saw, I’m still not sure to this day. But it certainly taught me that a rigid way of thinking when it comes to teaching golf is a good way to find little success. And that might be the most valuable lesson I’ve ever learned as a teacher myself.
The Wisdom of Johnny O

The Wisdom of Johnny O

Over the years, as in all walks of life, a wonderful cast of characters has inhabited the USGTF, from both the examining side and the candidate side. These people make indelible impressions on all of us with their uniqueness which makes the fabric of our lives all the more colorful.

One such great character was the late USGTF examiner John Nichols, or “Johnny O” to his friends. He always had a positive outlook on life, upbeat even when adversity might defeat a lesser person. His passion for the game of golf was second to none, and he sought to influence each person he met with that same passion.

John passed away much too young in October 1994 at the age of 47, but for those of us at the USGTF, he will always be remembered. He was an excellent player, having played the Tour in the early 1980s, and had some insightful bits of wisdom that are being shared in writing here for the first time.

Course management – “Make your mistake on the green”

John liked to say this to anyone who failed to get a pitch shot or chip shot on the green. What he meant by this is that if you have a tough up-and-down and your chances of getting up-and-down aren’t that great, make sure the second shot that might not go in is a missed putt (a mistake on the green) and not another missed chip or pitch shot. In other words, get that pitch shot or chip on the green and make sure you have a putt, even if it’s a lengthy one.

John reasoned that it’s easier to make a longer putt than a shorter pitch or chip, so it’s imperative that the second shot for the up-and-down be a putt. How many times have we seen golfers – whether the general public, our students or even ourselves – get too “cute” and try to get a tough pitch shot close to the hole? More often than we care to speculate, such a shot attempt leaves us with another pitch or chip, and sometimes in a worse situation than the original shot left us.

Hit shots with the right hand only

Every now and then, just for fun, John played one-handed using his right hand only. John was remarkably proficient with this method, often making pars and still able to shoot in the 40s for nine holes.

He pointed out that people who come over-the-top are only able to do so because both hands are on the club. If you swing with the right-hand only (for right-handed players), coming over-the-top is virtually impossible. It also teaches the golfer the proper wrist action and late release that so many golfers struggle with.

Swinging with the right hand only produces other benefits. In order to strike the ball cleanly, the golfer must complete his swing to the follow-through. It also teaches the proper clubhead-to-ball relationship at impact. Finally, it helps people learn the proper downswing sequence of lower body, upper body, and arms and hands, because it’s very difficult to swing this way with the arm and hand leading the downswing, as people are able to do with both hands on the club.

Toe the club in for pitch shots from thick rough

Thick rough around the green is a difficult challenge for most players, especially for those who play out of Bermuda grass in the South or in tropical climates. John was okay with the traditional methods of playing this shot, either like a sand explosion shot (where the clubface was opened) or with a square face and a steep angle of descent, but he had a different way of handling this situation. John recommended toeing the club in so that the clubface was closed at a 45° angle, and then taking a normal chip shot swing. By having the toe lead the clubhead into the ball, it would cut through the grass with less resistance. The grass would also open the clubface up to a certain degree, so the golfer doesn’t need to aim farther right to compensate. This shot does take practice, but once you get the hang of it, you might find it ridiculously easy to get the ball fairly close to the hole.

Johnny O’s legacy lives on within the halls of the USGTF and the golfing world. In fact, it’s safe to say that it also lives on in the games of today’s students, because long-timers on the USGTF examining staff are still using his inspiration – and instruction – to influence and teach our current generation of teachers and golfers alike.
Making The Most Of Taking Golf Lessons An Open Letter To Our Students

Making The Most Of Taking Golf Lessons An Open Letter To Our Students

By David Vaught USGTF Master Golf Teaching Professional®, Vista, California

We hear very often how difficult golf is. There is no doubt that hitting a 1.68-inch ball with a flat surface on the end of a stick seems crazy. Add trees, water, weather, and worst of all, the human brain, and it can seem almost impossible. But there is something about golf that is even more difficult sometimes than the game itself, and that is the experience of taking instruction from another person on how to perform the difficult task of hitting a golf ball. So, how do you get the most out of golf instruction? There are several keys to maximizing the instruction you receive. First of all, let’s assume you are taking the lesson from a qualified, knowledgeable instructor. That is another subject; therefore, sticking with our objective, we will assume the person giving you the lesson is qualified to help you improve.

Let’s begin with the most important key to improving through lessons: start the lesson with an open mind. A common refrain for swinging a golf club, and this can apply to any sport, is the phrase “feel is not real.” What does that mean? Basically, what we think we are doing and our perception of the motion we are performing is far different than what we are actually doing. Therefore, understand your perception of reality is different than what the instructor is seeing. Allow the instructor to explain your issues and develop a plan of attack.

Understand that your current motion will feel “natural,” no matter how detrimental it may be to your success. Human beings are amazingly adaptable. We are built to learn, good or bad. Even the worst swings you see on the driving range feel great to that person performing it.

Communication. Instructors want to understand your goals, how you feel about any previous instruction, what you think about when you swing the club, or what you are trying to do when you practice. Some golfers are embarrassed, to be honest. Your instructor has most likely seen and heard it all, so there is no reason to hold back. If you have been working on a tip that you found on the Internet or something your friend told you, let the instructor know.

Ask questions. If you do not understand something, do not be shy or proud to tell the instructor. If you do not, they will assume you understand. Believe me, we love it when you ask questions. If nothing else, it gives us a chance to show how smart we are!

Video can be a great teaching tool. When an instructor shows you a video of your swing, pay close attention to what they are talking about and focus on their observations. Often, golfers are looking at what catches their eye and not what the instructor is pointing out. The untrained eye will see the symptoms; the trained eye will see the disease, or in other words, the systemic problem you have. Don’t get caught up in things the instructor doesn’t want you to think about. One thing I have learned after 45 years in golf, 33 professionally, is that no one likes the way their swing appears visually. We are all hyper-critical when watching ourselves on video – even tour players.

Do not forget to ask the instructor for a practice plan. Any good instructor is going to give you specifics on how they want you to practice. Just like a fitness routine or diet plan, follow the plan they give you. Do not, I repeat, do not stray off into the never-never land of golf tips. That will only slowdown your progress or even make you worse. At the same time, you wasted your money and time on the lesson by “chasing the secret.” Guess what? There is no secret.

Lastly, be patient. Unlearning and learning a physical motion takes time. Band-aids can produce temporary good shots, but you will be sacrificing long-term improvement. I have seen many examples of students that were ready to give up just before making a leap in their shot making and ball striking. The golf swing is a journey with no destination. Look at your lessons as another small step in the right direction. It just takes time.

Most of all, have fun and try to enjoy the learning process. Embrace and enjoy the practice and the challenge of improving. For many of us, the difficulty of golf is what made us fall in love with the game to begin with. Good luck!
Drills That Work

Drills That Work

By Ken Butler USGTF Master Golf Teaching Professional® Bradenton, Florida

One of the hardest things for a student to accomplish is to take what you have been working on with them to the golf course. That’s why I think it is so important to give them a couple of drills that they can take with them to the course. Deciding which drill or drills that they can use will obviously depend on what you have been working on together on the practice tee.

Here are a couple of drills that I have found to be very beneficial. To be clear, the player must understand that he must have some swing thoughts, although it would be great to go out there and just swing. I think we all know that’s a pretty impossible exercise.

These two drills can be taken to the course and substituted for your regular practice swing. It will clear the head and help to promote a more beneficial, relaxed swing Have a swinging day!

#1 Swing the club with one hand only, preferably with the right hand for a right-handed player. However, a couple of swings with the left hand only will not hurt. When you swing the club with the right hand only, you will feel the body movement better in regard to moving the lower body in the proper sequence. Start by swinging the club, holding the club at the shaft end closest to the head of the club. This will also help the student get the feeling of the club whipping and creating clubhead speed through the hitting zone after one or two swings. Then, reverse the club and swing one-handed, holding the club at the grip end. This exercise can be performed instead of a practice swing, so there will be no slowing of play.


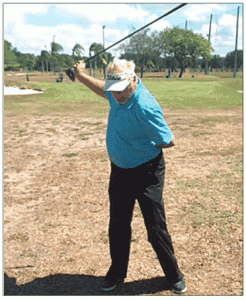
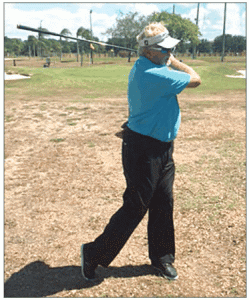
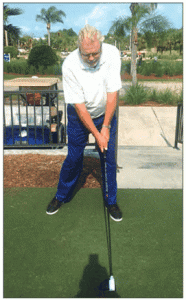
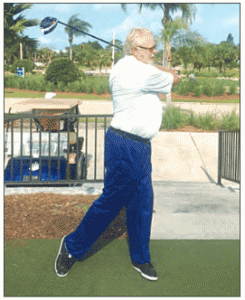
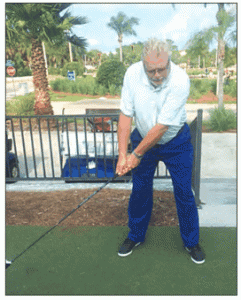
  #2 Follow-through drill. As a practice swing, take the club about one-third of the way back. Take a little pause, then bring the club slowly into the impact zone, watching the club square up at impact, but now it is important to go through to a full-balanced finish position: belt buckle facing the target, left foot planted, right shoulder closest to the target, club behind the back with the arms folded in a classic follow-through position. I have found in my own swing, throughout the years, that if I could finish in a good position, the shot would be pretty good. Balance is everything in a golf swing, or in any other sport.